Imagine this
You're running a critical backup script on a server via SSH, or you're compiling a massive project. The process is 50% done and everything is going smoothly. Suddenly… the internet disconnects, or your laptop shuts down because the battery died.
Panicked and stressed, you check the server again and see the connection is lost, the process is left half-finished, and your database or project files are corrupted or gone.
Or another everyday scenario: you're developing a project. In one terminal tab you need to keep a local server running (like Laravel or Python), in another tab you're writing code in Neovim, and in yet another tab you want to run Git or Docker commands. You constantly have to switch between OS tabs, terminals pile on top of each other, your focus shatters, and managing all these windows becomes a nerve-wracking headache.
This is when you deeply feel you need something beyond a simple terminal; a tool that, like a versatile assistant, rescues your work environment.
What is tmux?
To solve all these nightmares and this chaos, a tool called tmux (short for Terminal Multiplexer) was created.
Simply put, tmux allows you to keep a terminal session alive in the background on your server or system, split your terminal environment into multiple sections, and do several things at once without losing focus.
Key Features of tmux
Tmux isn't just a local tool; it's a lifestyle in a text-based environment! Let's look at what this tool does for you:
Persistent Sessions
This is tmux's greatest magic. When you run your commands inside a tmux session, that session runs as an independent process in the background of your operating system.
- If your internet disconnects or you close your terminal window, your process on the server does not stop.
- Tomorrow, or even next week, you reconnect to the server via SSH, type the reattach command (
tmux attach), and you return exactly to where you left off – with the same outputs, the same state!
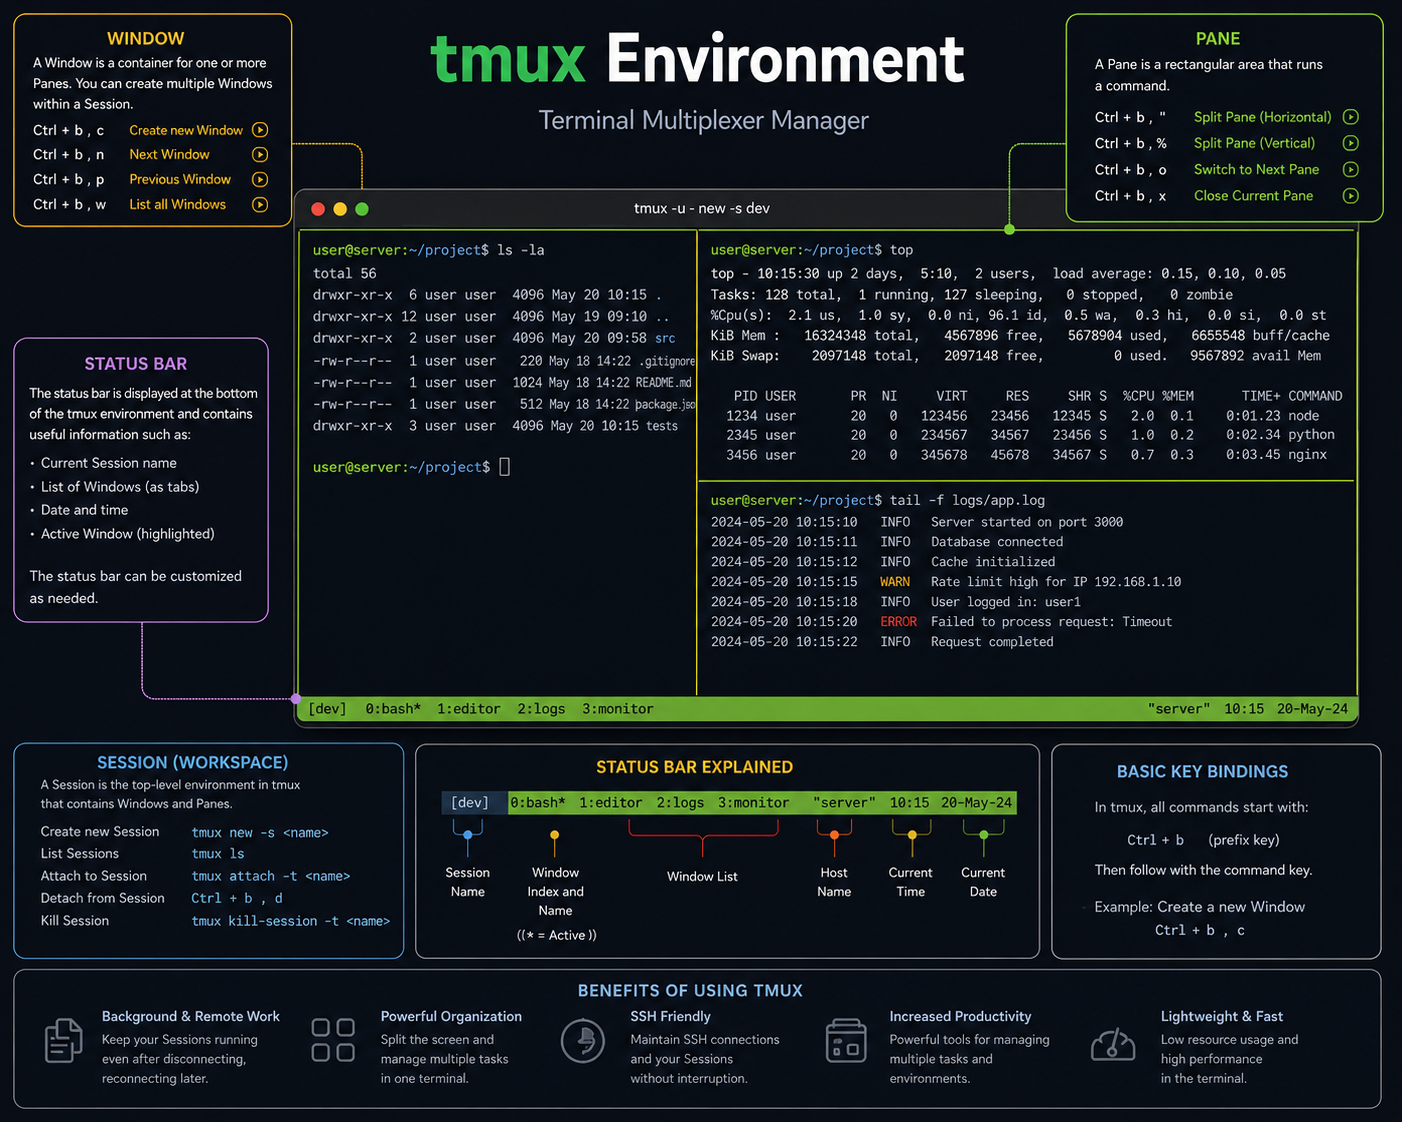
Splitting the Screen (Panes & Windows)
You no longer need to open 10 tabs in iTerm2 or your default terminal. Tmux allows you to:
- Windows: Like browser tabs, create completely separate windows within one session (e.g., one window for your editor, another for testing).
- Panes: Split a single terminal screen horizontally or vertically. You can code on the left and watch live server logs on the right.
Fast, Mouse-Independent Navigation
Tmux is managed entirely with the keyboard. Using a prefix key (default Ctrl+b), you can move between panes, resize them, or create a new window without touching the mouse. This dramatically increases your speed and efficiency.
Sharing Your Terminal Environment (Pair Programming)
Two people can simultaneously connect to the same session on a server. Whatever the first person types, the second sees live. This feature is fantastic for remote debugging or teaching.
A Quick Summary of Tmux's Structure
To help you remember, imagine tmux's structure like this:
- Session: Your entire workspace for one project. Can contain multiple windows.
- Window: A full terminal screen (like a tab).
- Pane: Smaller sections within a single window that let you multitask.
Alright, time to get practical! To make working with tmux second nature, we'll walk through a real, unified example:
Scenario: Let's say you're working on a blog project. You need an environment for coding (using Neovim/Vim), an environment to keep your local server running, and an environment for Git commands.
The First Rule of Tmux: The Prefix Key
Before executing any command inside tmux, you need to tell tmux that the command is for itself, not for the program running inside it. This is done with a key combination called the Prefix.
- The default prefix is
Ctrl + b(written asPrefixin the text). - That means: press
Ctrlandbtogether, release them, and then press the next key.
Step One: Session Management – Creating and Entering
A session is your entire protective umbrella. Our entire blog project will reside inside one session.
1. Create a Named Session
Open your regular terminal and create a session named blog_project:
tmux new -s blog_project
(You are now inside the tmux environment and see a green status bar at the bottom of your screen).
2. Safely Exit a Session (Without Closing Your Programs)
Let's say you're done for the day and want to close your laptop or disconnect from the server, but keep your scripts running.
- Shortcut: Press
Prefixand then thedkey (Detach). - You return to your original terminal, but your project's process stays alive in the background.
3. List Active Sessions
To see what sessions are running in the background:
tmux ls
(The output shows you that the blog_project session is still alive).
4. Reattach to a Session
To return to the session you left behind:
tmux attach -t blog_project
You come back exactly to the point where you pressed Detach.
Step Two: Window Management – Project Tabs
Now that we're inside our blog_project session, we need several separate screens. By default, one window is open.
1. Create a New Window (e.g., for Git)
- Shortcut: Press
Prefixand thenc(Create). - A new tab appears in the status bar. To rename it so we know what it's for:
- Rename window: Press
Prefixand then,(comma). Type the new namegitand press Enter.
2. Move Between Windows
Now we have two windows (the original one, and the one for Git). To navigate between them:
- Next window:
Prefixthenn(Next) - Previous window:
Prefixthenp(Previous) - Select by number:
Prefixthen the window number (e.g.,0or1, as shown in the status bar). - Interactive window menu:
Prefixthenwshows a visual list of all windows; use arrow keys to select.
Step Three: Pane Management – Splitting a Single Screen
Let's go back to the first window (number 0). We want to, on this same screen, both code and monitor the server. This is where we split the screen.
1. Split the Screen Vertically (Left and Right)
- Shortcut: Press
Prefixand then%(percent sign). - The screen splits into two halves: left and right.
2. Split the Screen Horizontally (Top and Bottom)
Move to the right pane and this time split it top and bottom:
- Shortcut: Press
Prefixand then"(double quote). - You now have 3 panes in one window! In one you can have Neovim open, in another your local server running, and in the third you can watch logs.
3. Move Between Panes (Navigating Within a Window)
To move your keyboard focus between these pieces:
- General navigation shortcut:
Prefixthen theokey (cycles through panes). - Precise direction with arrows:
Prefixthen one of the arrow keys – go wherever you want.
4. Resize Panes
If a pane is too small and you want to enlarge it:
- Press
Prefix, then hold downCtrland simultaneously press the arrow keys a few times to move the pane border.
5. Zoom a Pane to Full Screen (Temporarily)
Sometimes you want to temporarily see the code inside a small pane in full screen, then return to the 3-pane layout:
- Shortcut:
Prefixthen thezkey (Zoom). The pane becomes full screen. Press the same shortcut again to return to the previous layout.
6. Close a Pane
When you're done with your project and want to close a pane:
- Type
exitinside it, or pressPrefixand thenxand confirm (y).
Quick Cheat Sheet (for mental review)
To keep it handy, here's a summary of the entire scenario in a table:
| Section | Goal | Shortcut (after Prefix) | Text Command (in regular terminal) |
|---|---|---|---|
| Session | Create new named session | - | tmux new -s <name> |
| Safe exit (Detach) | d |
- | |
| List sessions | - | tmux ls |
|
| Reattach (Attach) | - | tmux attach -t <name> |
|
| Window | Create new tab | c |
- |
| Rename tab | , |
- | |
| Next / previous tab | n / p |
- | |
| Visual list of tabs | w |
- | |
| Pane | Split vertically (left/right) | % |
- |
| Split horizontally (top/bottom) | " |
- | |
| Move between panes | arrow keys or o |
- | |
| Temporary zoom | z |
- | |
| Resize borders | hold Ctrl + arrows |
- | |
| Close current pane | x (or type exit) |
- |
By practicing this simple scenario on your own system, within a few days your hands will become incredibly fluent, and terminal management will become second nature to you!