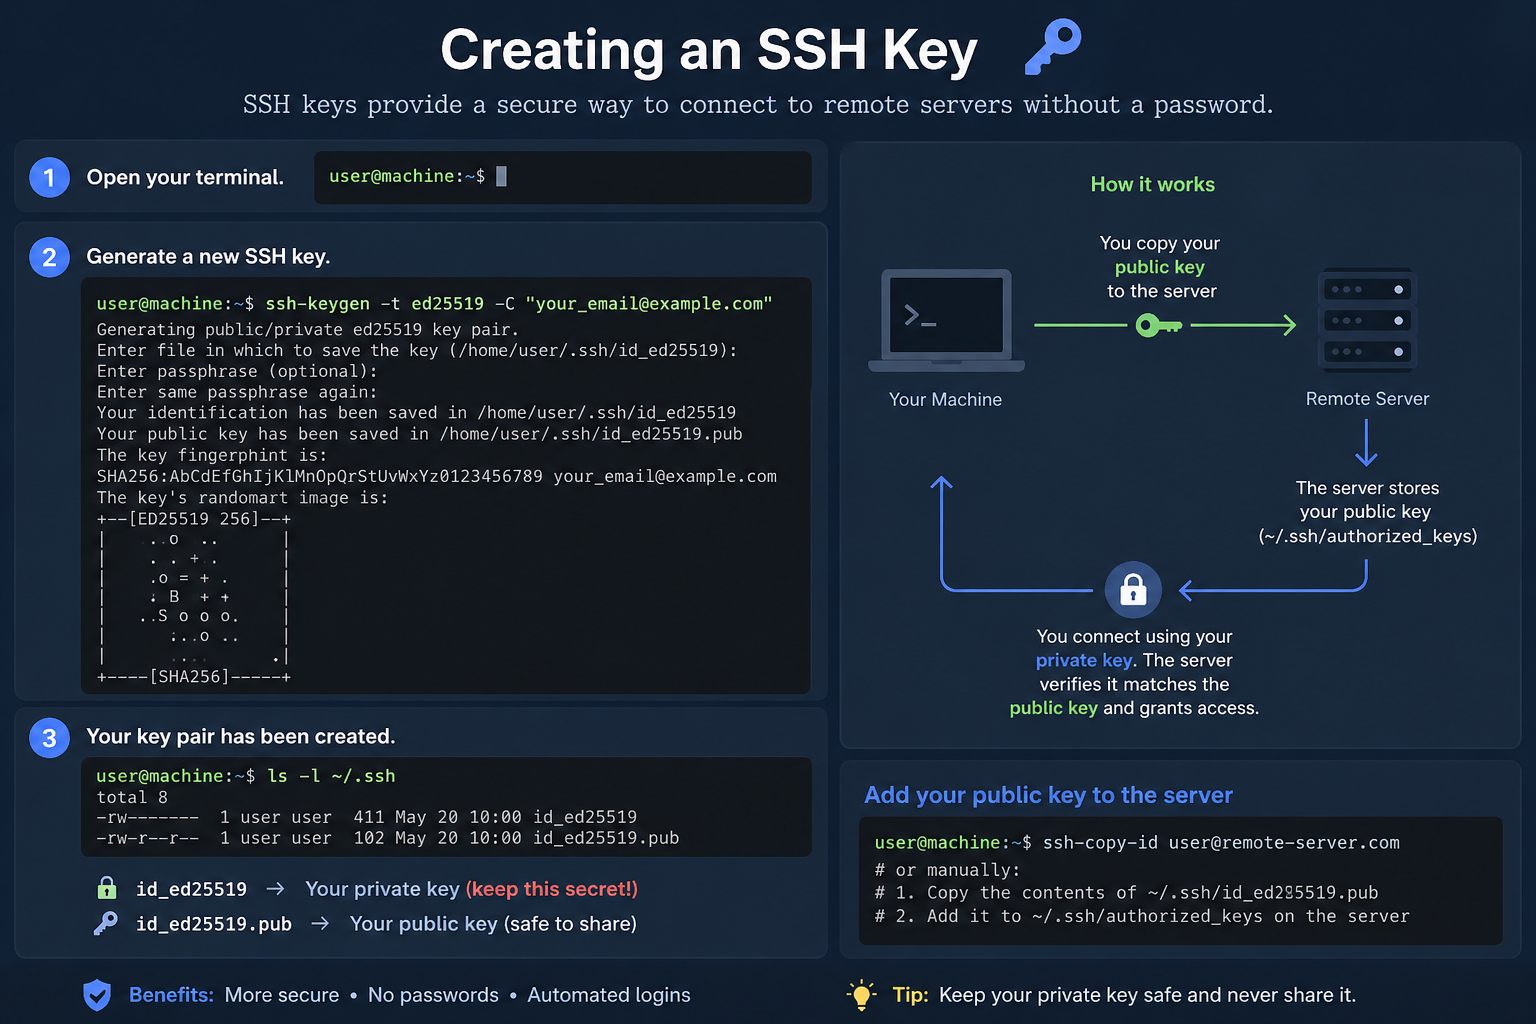
Goodbye Passwords: Authentication with SSH Keys
If you're tired of entering your password every time you connect to Linux servers, or you're concerned about brute-force attacks on port 22 of your server, it's time to switch to SSH Keys. In this article, we’ll go through all the details of creating, managing, and securing these keys.
What is an SSH Key and How Does It Work?
SSH key authentication is based on asymmetric encryption. Unlike passwords, which are a shared secret between you and the server, this method uses a key pair:
- Public Key: Like a lock. You place it on the destination server. Exposing this key is not a security risk.
- Private Key: Like the actual key to the lock. This must remain only on your personal system.
Authentication process: When you try to connect, the server encrypts a challenge using the "lock" (public key) and sends it to you. Your client decrypts it using the "real key" (private key). If the response is correct, the server grants access—without any password being transmitted over the network.
Types of Encryption Algorithms; Which One is More Secure?
When generating a key, you must choose an encryption algorithm. Common options include:
1. RSA
The oldest and most widely used algorithm. For adequate security today, RSA keys should be at least 2048 bits long (preferably 4096 bits).
- Advantage: Compatible with almost all older servers.
- Disadvantage: Slower and larger compared to modern algorithms.
2. Ed25519
This algorithm is based on elliptic curves and is currently considered the most secure and efficient option.
- Advantage: Very fast, very small key size, and strong resistance against side-channel attacks.
- Recommendation: Always use this unless your server is very old.
3. ECDSA
Similar to Ed25519 but based on NIST standards. It offers good security, but some experts prefer Ed25519 due to concerns about complexity and potential backdoors in government standards.
Setup Steps
Step 1: Generate a Key Pair
Run this command on your system:
ssh-keygen -t ed25519 -C "your_email@example.com"
Where Are the Keys Stored and Which Is Which?
After generating the key, two files are created in the hidden .ssh directory in your home path (e.g., /home/user/.ssh).
Note: To view this directory and its contents in the terminal, use
ls -labecause it starts with a dot and is hidden.
These two files are usually named as follows (assuming Ed25519):
id_ed25519(no extension): This is your private key. Treat it as your digital identity! Never share it or move it off your system.id_ed25519.pub(with .pub extension): This is your public key. This is the file whose contents you copy to the server.
Why Do We Enter an Email When Creating a Key?
At the end of the key generation command, there is a part like -C "email@example.com". This email plays no role in the cryptographic process; it is simply a comment.
- Purpose: When you have multiple keys for different projects or servers, this email is written at the end of the public key file so you can identify which key belongs to whom or to which system. You can replace it with any text (e.g., "Work-Laptop").
Step 2: Transfer to the Server (Smart and Easy Method)
The best way is to use the automatic tool on your system:
ssh-copy-id user@server_ip
This command finds your .pub file, connects to the server, places it into the authorized_keys file, and sets the correct permissions.
Manual Transfer (Plan B)
If the above tool is unavailable:
- Copy the contents of
id_ed25519.pub. - On the server, create the
.sshdirectory and edit theauthorized_keysfile:
mkdir -p ~/.ssh
chmod 700 ~/.ssh
echo "Public_Key_Copy_Text" >> ~/.ssh/authorized_keys
chmod 600 ~/.ssh/authorized_keys
Final Step: Disable Password Authentication
Once you confirm that key-based login works, disable password authentication on the server so that attackers cannot log in even if they have the password:
- Edit the
/etc/ssh/sshd_configfile. - Change
PasswordAuthenticationtono. - Restart the service:
sudo systemctl restart ssh